How to Remove Deep Scratches from a Car: Ultimate Guide
Learning how to remove deep scratches from car paint at home can save you a lot of money. You must follow the right techniques to ensure the finish looks original and lasts for years. Proper preparation is the most important step to prevent further damage to the surrounding paint.
Most deep scratches require wet sanding and polishing to restore the surface smoothness. Using a rubbing compound is essential to bring back the original shine of your vehicle.
Identifying the depth of the scratch is the first task before applying any repair chemicals. Always work in a shaded area to avoid any unwanted reactions on the car body. Taking your time during each step will ensure that the final result is smooth and clean.
Essential Tools and Materials for DIY Scratch Repair
Having the right tools is crucial for safe and effective scratch repair at home. Here’s what you’ll need for deep scratch removal:
- Scratch Remover Compounds / Polishes: For smoothing and blending scratches.
- Touch-Up Paint & Clear Coat: Match your car’s original color code for seamless repair.
- Fine Sandpaper: For leveling deep scratches before painting.
- Microfiber Cloths: Prevent additional scratches during cleaning and polishing.
- Buffing Pads & Polisher: For professional-grade shine and blending.
- Protective Gloves & Mask: Protect your hands and lungs from chemicals and dust.
- Masking Tape & Newspaper: To protect surrounding areas when applying paint.
Pro Tip: Work in a well-lit garage or shaded outdoor space to see imperfections clearly and avoid harsh sunlight affecting paint curing.
Step-by-Step Guide to Remove Deep Scratches at Home
Identifying the depth of the scratch is the first task before applying any repair chemicals. Always work in a shaded area to avoid any unwanted reactions on the car body. Taking your time during each step will ensure that the final result is smooth and clean.
Clean and prepare the car surface
Wash the scratched area thoroughly with car soap and water to remove any dirt or debris. Dry the surface with a microfiber cloth and use rubbing alcohol to eliminate old wax residues.
Sand the scratch for a smooth finish
Use 1500-grit sandpaper with light pressure to level the deep scratch with the surrounding paint. Always sand in a straight line along the scratch to avoid creating new marks on the car body.
Apply primer to the exposed metal
Apply a thin layer of primer if the scratch is deep enough to reveal the bare metal underneath. Let the primer dry completely to ensure the new paint sticks properly and prevents future rust.
Apply touch-up paint in thin layers
Use a fine brush to apply the touch-up paint in multiple thin layers for a professional look. Allow each layer to dry before applying the next to prevent any uneven runs or thick spots.
Apply a clear coat to seal the repair
Once the paint is dry, add a light layer of clear coat to protect the repair from the elements. This step ensures the repaired area blends naturally with the original factory shine of your car.
Polish and buff for a flawless shine
Use a rubbing compound and a microfiber cloth to blend the new paint with the surrounding area. Apply a final coat of car polish to enhance the shine and provide long-lasting protection for the paint.
Common Mistakes to Avoid When Repairing Car Scratches
DIY scratch repair is rewarding, but even small mistakes can lead to poor results or further damage. Following the right process carefully ensures a smooth, professional finish.
- Skipping cleaning or prepping: Dust and dirt can cause uneven paint application.
- Using incorrect grit sandpaper: Too coarse can damage paint; too fine won’t level deep scratches.
- Applying thick paint layers leads to drips, uneven surfaces, and longer curing times.
- Ignoring safety gear: Gloves, mask, and eye protection prevent chemical exposure and injury.
Expert Tip: Take your time and follow each step precisely to achieve a smooth and even finish.
Rushing the process can lead to visible flaws, so patience is the key to professional-looking results.
Seasonal and Local Tips for Effective Scratch Removal
Weather and environment play a crucial role in the success of DIY car scratch repair. Choosing the right time and conditions can improve paint adhesion, drying time, and overall finish quality.
Ideal Weather Conditions
- Work in moderate temperatures (20–30°C) for best results.
- Avoid extremely hot days, as heat can cause paint to dry too quickly and unevenly.
- Cold weather can slow down drying and affect paint bonding.
Humidity and Moisture Control
- High humidity can trap moisture under paint, leading to poor adhesion.
- Always work in a dry, well-ventilated area to ensure a smooth finish.
Best Time of Day for DIY Repair
- Early morning or late afternoon is ideal when the sunlight is not too harsh.
- Avoid direct sunlight, as it can cause paint streaks and uneven polishing.
Seasonal Timing Tips
- Winter: Better for polishing but slower drying—allow extra curing time.
- Summer: Faster drying but requires shaded work areas.
- Rainy Season: Avoid repairs due to high humidity and moisture exposure.
Expert Tip: Always choose a shaded, dust-free environment with a stable temperature for the best results. Controlling weather and surroundings ensures your scratch repair looks smooth, durable, and professionally finished
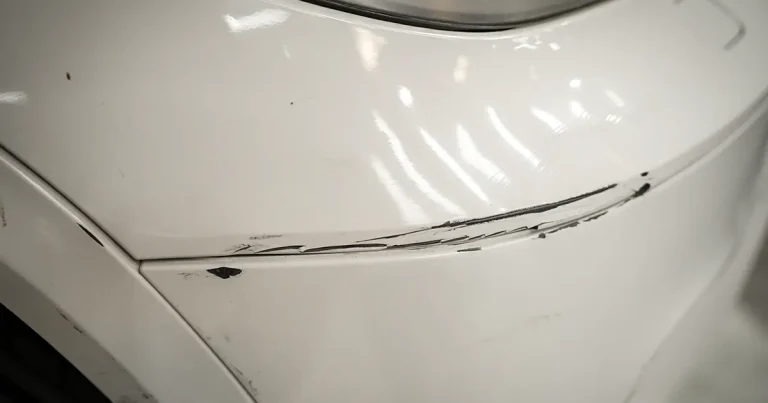
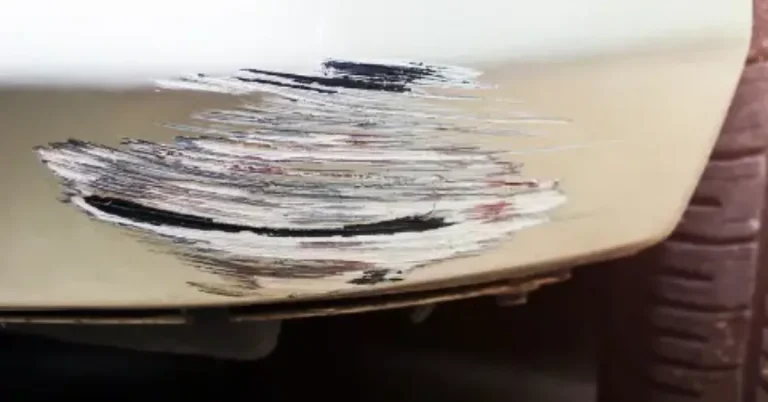
Identifying Your Scratch: Clear Coat vs. Deep Paint Issues
Identifying the depth of a scratch is the most critical step before starting any DIY restoration process on your vehicle. Understanding whether the damage is superficial or deep ensures you use the correct tools and avoid further paint issues.
The Clear Coat Scratch: Surface Level Damage
This type of scratch only affects the top protective transparent layer of your vehicle and does not reach the actual color. If the scratch temporarily disappears when wet, it is likely just in the clear coat and can be buffed out relatively easily.
The Paint and Primer Scratch: Deep Surface Damage
If you can see white or bare metal underneath the scratch, you are dealing with deep paint damage that requires a multi-step fix. This is where removing deep scratches becomes technical, as leaving these layers exposed can lead to rust and permanent body damage.
Final Thoughts
With the right tools and techniques, deep scratches can be repaired at home. For expert guidance, rely on Exotic Car Care Service in Abu Dhabi. Focus and care ensure a smooth, long-lasting finish. Following a professional restoration process protects your car and maintains its value for years.